Pages

Tuesday, April 24, 2012

KBps and kbps ?


Antara Bandwidth ISP dan kecepatan download

Tahukah anda KBps dan kbps itu tidak sama ? banyak orang beranggapan kecepatan yang diberikan ISP misalkan 512 kbps saat kita mendownload sesuatu pada kenyataannya bandwidth yang di dapat tidak konstan 512 KBps sehingga tidak jarang orang sering mengeluh bahwa ISP mereka berjanji memberikan koneksi 512kbps tetapi mereka jarang dapat men-download file apapun di 512 KBps. Mereka tidak melihat perbedaan dalam kasus ini dan langsung berfikir bahwa terdapat kecurangan yang dilakukan oleh ISP atau kita menyalahkan kualitas ISP yang buruk. Seperti disebutkan sebelumnya kecepatan transfer data selalu dihitung dalam kilo bit per detik (kbps) sehingga konektivitas dari ISP 512 kbps artinya dapat mendownload maksimal 512 kilo bit per detik.
Di sisi lain, ukuran file selalu dinyatakan dalam Kilo Bytes dan kecepatan Download selalu dihitung berdasarkan berapa banyak Bytes per detik di-download dan karenanya Kilo Bytes per detik (KBps). KBps dan kbps tidak bisa diartikan sama.
Untuk menghitung kecepatan download maksimum koneksi "X kbps", kita perlu menggunakan rumus sederhana sebagai berikut.

Download KBPS speed = (Kbps value*1000) /8)) / 1024

Misalkan kita memiliki koneksi 512 kbps

nilai kbps * 1000 = 512 * 1000 = 512000

512000/8 = 64000

64000/1024 = 62,5 KBps

Oleh karena itu secara teoritis koneksi internet bandwidth 512kbps bisa download di kecepatan 62,5 KBps

Jika masih bingung dapat juga didapat dengan hanya mengalikan nilai kbps dengan 0,1220703125 untuk mendapatkan nilai KBps.

512 kbps * 0,1220703125 = 62,5 KBps.
Internet connectivity
Download speed (approx)
256 kbps
31.3 KBps
384 kbps
46.9 KBps
512 kbps
62.5 KBps
768 kbps
93.8 KBps
1 mbps ~ 1000kbps
122.1 KBps

Dalam kasus lain kecepatan koneksi juga tergantung sinyal jaringan kadang dan juga hardware karena itu speed bandwidth yang didapat terkadang berkurang dari yang asli antara 15-20 % bandwidth yang didapat. Saya rasa kebingunan atara KBps dan kbps mungkin sedikit  terjawab, jadi ketika anda mengeluh koneksi 512 kbps tidak memberikan kecepatan download sebesar 512KBps sekarang anda tahu alasannya mengapa.

Sunday, April 8, 2012

Sonic 4 Episode II


Sega baru saja mengumumkan tanggal rilis untuk seluruh versi dari game Sonic 4: Episode II.

Sonic 4: Episode II pada pertama kali diumumkan secara formal oleh Sega Jepang pada awal tahun 2012. Sega juga sempat mengatakan bahwa sekuel dari game Sonic 2D ini akan hadir dengan peningkatan yang signifikan dari berbagai aspek, terutama grafis dan animasi.

 Berikut ini adalah daftar jadwal rilis game Sonic 4: Episode II, lengkap dengan platform-nya:

  • 15 Mei 2012 - PlayStation Network
  • 16 Mei 2012 - Xbox Live Arcade
  • Bulan Mei 2012 (tanggal akan segera diumumkan) - iOS, PC
  • Bulan Juni 2012 (tanggal akan segera diumumkan) - Android
  • Bulan Juli 2012 (tanggal akan segera diumumkan) - Windows Phone
Sumber : http://www.kotakgame.com/berita/detail.php?id=17178

Reset Password Windows

Pernah lupa password login ? atau ada yang sengaja iseng menggantinya ? apapun kejadiannya tidak dapat masuk login windows kesayangan merupakan hal yang menyebalkan. Oke kita langsung saja lakukan reset password windows, siapkan CD tools MiniPE XPE 2009 v.1 dan ikuti langkah berikut ini :

1.       Booting melalui CD pada menu Boot pilih Launch “Windows XPE [POPU] 2009 v.1” tekan enter
2.       Tunggu hingga proses Booting selesai dilakukan 
3.       Klik Start--->Program--->Password Tools--->Password Renew
  
 4.       Isikan target directory C:\WINDOWS
 
5.       Pada menu Select a task pilih Renew existing user password scroll user pada kolom Account pilih ex: Administrator lalu ganti password dengan memasukan password baru
6.       Setelah selesai memasukan password baru pada menu Select a action klik Install Penggantian password pun telah berhasil dilakukan
7.       Cek untuk memastikan saat login ke Windows dengan memasukkan password yang telah dirubah
Tools ini dapat digunakan sebagai alternative untuk membackup data anda apabila windows  anda tidak dapat  booting karena system corrupt ataupun karena virus. Tools ini dapat digunakan pada Windows XP, Windows Vista, Windows 7 dan penulis melakukan test pada Windows 2003 SP2 Standar Edition.

reset password windows xp, reset password windows, mini pe, hack password windows, jebol password windows, merubah password administrator windows, reset password administrator, membobol password windows

Friday, March 30, 2012

Bandwidth Splitter


Bandwidth Limitter For ISA SERVER

Nyari program buat nyekek bandwith user untuk ISA SERVER 2000 ternyata lumayan susah
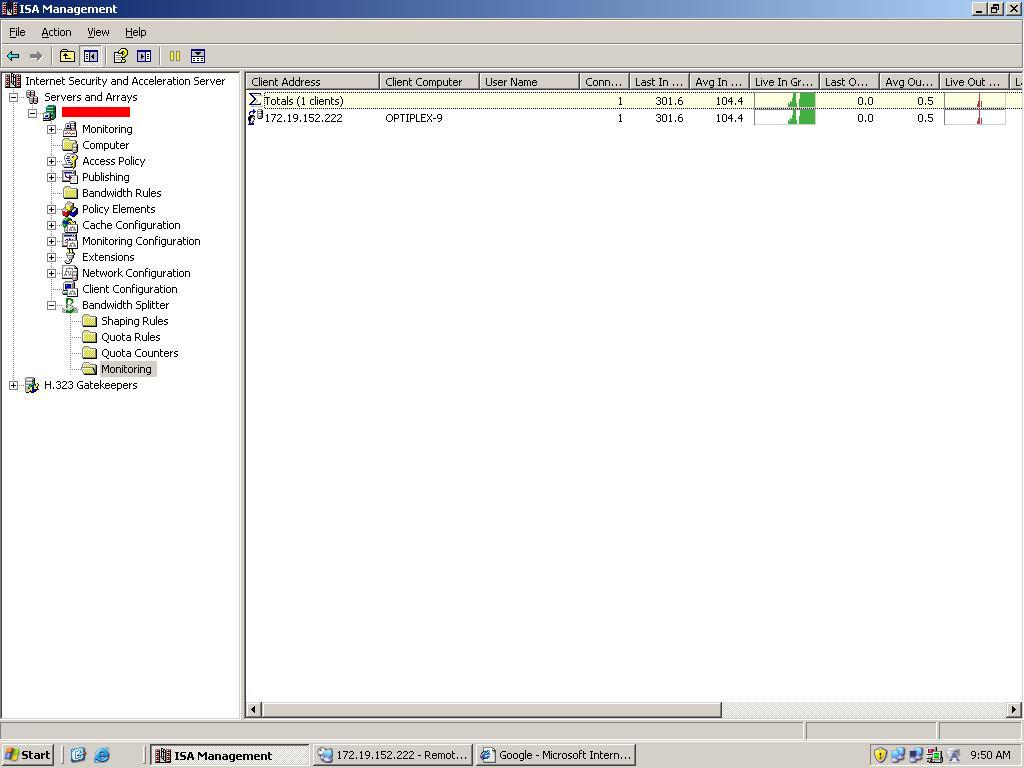
setelah cari sana sini ketemu juga yang simple dan embeded pada mesin ISA SERVER 2000,, oke deh sekarang kita bahas sedikit software Bandwidth Splitter ini
Bandwidth Splitter adalah program ekstensi untuk Microsoft ISA Server (ISA SERVER
2000/2004/2006) yang memiliki fitur untuk memungkinkan berbagi bandwidth koneksi
internet yang ada dan mendistribusikannya ke semua pengguna dan server menurut aturan
yang dibuat.
Fitur utama dari Bandwidth Splitter adalah:
  • Membatasi bandwidth koneksi internet yang digunakan oleh individu pengguna dan host, atau kelompok pengguna dalam lalu lintas jaringan
  • Mengkonfigurasi kuota untuk penggunaan maksimum lalu lintas internet yang diijinkan (dalam megabyte) dan dapat dikonfigurasi berdasarkan waktu (sehari, seminggu atau sebulan) untuk pengguna individu dan host atau kelompok pengguna
  • Real-time monitoring semua pengguna dan koneksi melalui ISA  Server oleh administrator, termasuk koneksi bandwidth yang digunakan oleh  pengguna individu
  • Menghasilkan laporan secara rinci penggunaan bandwidth dari  IP klien, quota, berbentuk grafik yang menunjukkan dinamika penggunaan bandwidth

Program ini dapat di download pada alamat berikut http://www.bsplitter.com/download.aspx software ini dapat digunakan sampai 10 client sayangnya bila melewati dari batas yang di tentukan tentunya kita harus membeli lisensi tersebut untuk dapat manggunakannya

Note :
upayakan IP client yang ingin di batasi Bandwidth nya saja bila terdapat user yang
unlimited tentunya tidak perlu di setting di Bandwidth splitter agar jumlah klient
tidak lebih dari 10 yang berarti dapat digunakan tanpa batas waktu asal tidak
melebihi batas 10 client yang telah ditentukan

Thursday, March 29, 2012

Kode HP Nokia


Gara - gara ngotak atik HP nokia jadul jadi pengan nulis diblog apalagi lupa kode yang dulu sering digunakan.. dari pada lupa biar inget mending ditulis lagi rasanya informasi ini lama alias basi tapi masih berguna lah buat orang pelupa seperti gue he he ... let's cekidot...

Kode tombol rahasia di keypad hp ponsel yang bermerek Nokia baik yang CDMA maupun yang GSM;

1. Melihat IMEI (International Mobile Equipment Identity)
Caranya tekan * # 0 6 #

2. Melihat versi software, tanggal pembuatan softwre dan jenis kompresi software
Caranya tekan * # 0 0 0 0 #
Jika tidak berhasil coba pencet * # 9 9 9 9 #

3. Melihat status call waiting
Caranya tekan * # 4 3 #

4. Melihat nomor / nomer private number yang menghubungi ponsel anda
Caranya tekan * # 3 0 #

5. Menampilkan nomer pengalihan telepon all calls
Caranya tekan * # 2 1 #

6. Melihat nomor penelepon pada pengalihan telepon karena tidak anda jawab (call divert on)
Caranya tekan * # 6 1 #

7. Melihat nomor penelepon pada pengalihan telepon karena di luar jangkauan (call divert on)
Caranya tekan * # 6 2 #

8. Melihat nomor penelepon pada pengalihan telepon karena sibuk (call divert on)
Caranya tekan * # 6 7 #

9. Merubah logo operator pada nokia type 3310 dan 3330
Caranya tekan * # 6 7 7 0 5 6 4 6 #

10. Menampilkan status sim clock
Caranya tekan * # 7 4 6 0 2 5 6 2 5 #

11. Berpindah ke profil profile ponsel anda
Caranya tekan tombol power off tanpa ditahan

12. Merubah seting hp nokia ke default atau pabrikan
Caranya tekan * # 7 7 8 0 #

13. Melakukan reset timer ponsel dan skor game ponsel nokia
Caranya tekan * # 7 3 #

14. Melihat status call waiting
Caranya tekan * # 4 3 #

15. Melihat kode pabrik atau factory code
Caranya tekan * # 7 7 6 0 #

16. Menampilkan serial number atau nomer seri hp, tanggal pembuatan, tanggal pembelian, tanggal servis terakhir, transfer user data. Untuk keluar ponsel harus direset kembali.
Caranya tekan * # 92702689 #

17. Melihat kode pengamanan ponsel anda
Caranya tekan * # 2 6 4 0 #

18. Melihat alamat ip perangkat keras bluetooth anda
Caranya tekan * # 2 8 2 0 #

19. Mengaktifkan EFR dengan kualitas suara terbaik namun boros energi batere. Untuk mematikan menggunakan kode yang sama.
Caranya tekan * # 3 3 7 0 #

20. Mengaktifkan EFR dengan kualitas suara terendah namun hemat energi batere. Untuk mematikan menggunakan kode yang sama.
Caranya tekan * # 4 7 2 0 #

21. Menuju isi phone book dengan cepat di handphone nokia
Caranya tekan nomer urut lalu # contoh : 150#

22. Mengalihkan panggilan ke nomor yang dituju untuk semua panggilan
Caranya tekan * * 2 1 * Nomor Tujuan #

23. Mengalihkan panggilan ke nomor yang dituju untuk panggilan yang tidak terjawab
Caranya tekan * * 6 1 * Nomor Tujuan #

24. Mengalihkan panggilan ke nomor yang dituju untuk panggilan ketika telepon hp anda sedang sibuk
Caranya tekan * * 6 7 * Nomor Tujuan #

Note :
- Kode diinput tanpa spasi
- Ada kode-kode nokia yang berlaku pada tipe tertentu saja

Wednesday, March 21, 2012

Instalasi ISA Server 2000 di windows 2003
Untuk dapat menginstalasi ISA Server 2000 pada windows 2003 direkomendasikan untuk menyiapkan hal berikut ini ;
·  Installer ISA Server 2000
·  Installer ISA Server Service Pack 1
·  Installer isahf255.exe (Hot Fix)
·  Installer Feature Pack 1
Install ISA Server 2000
Now for the fun part. Get out your ISA Server 2000 CD-ROM disk and put it into the drive, or connect to a network share that contains the ISA Sever installation files. Then perform the following steps to begin installing ISA Server on a Windows Server 2003 machine:
  1. Double click on the ISAAutorun.exe file on the ISA Server CD
  2. Click on the Install ISA Server link on the Internet Security & Acceleration Server 2000 splash page.
  3. You will see an ISA 2000 dialog box that informs you that you need to install ISA 2000 Service Pack 1 in order for things to work right. We know that, so we’ll click Continue
  1. Click Continue on the Welcome to the Microsoft ISA Server installation program page.
  2. Enter your CD Key in the CD Key dialog box. Click OK.
  3. Write down your Product ID as list in the Product ID dialog box. Click OK in the Product ID dialog box after writing this number down.
  4. Click I Agree in the Microsoft ISA Server Setup dialog box.
  5. Click the Full Installation button in the installation type dialog box. I am assuming you want to use all the features that ISA Server has to offer. You can use the Add/Remove Programs applet later if you want to remove some ISA Server features.
  6. In this example we are installing ISA Server in standalone mode, not in enterprise array mode. Click Yes in the dialog box that asks if you want to continue.
  1. Select the Integrated mode option on the Select the mode for this server page. You want to take advantage of the full power of your ISA Server firewall. Integrated mode gives you everything the Web Proxy and Firewall services have to offer. Go for it! Click Continue.

            11.  On the Web cache page, select a drive to put the Web cache file on. The drive must be NTFS. Type in a size of the cache in the Cache size (MB) text box and then click the Set button. Then click OK.
       12. On the LAT page, click the Construct Table button. On the Local Address Table page, remove the checkmark in the Add the following private ranges checkbox. Put a checkmark in the Add address ranges based on the Windows 2000 Routing Table checkbox. Remove the checkmark from the checkbox representing the external interface, and leave the checkmark in the checkbox for the internal interface. Click OK in the Local Address Table dialog box, then click OK in the Setup Message dialog box that informs you that the LAT was contstructed based on the Windows 2000 routing table (in spite of the fact that you’re installing ISA Server on a Windows Server 2003 machine).
       13. Click OK on the LAT dialog box after reviewing the list listing in the Internal IP ranges list.
         14. Unlike Windows 2000, Windows Server 2003 does not install IIS by default (yeah! You should NEVER run IIS services on a firewall – except for maybe the SMTP service). You will see a dialog box telling you that you’ll have to install the SMTP service if you want to run the SMTP Message Screener. Click OK to continue
        15. The ISA Server services are installed. You will see a warning balloon informing you that ISA 2000 will cause Windows to become unstable. Close the balloon, remove the checkmark from the Start ISA Server Getting Started Wizard checkbox, and then click OK in the Launch ISA Management Tools dialog box.
16. Click OK in the dialog box that informs you that setup was completed.  
17. Click OK in the dialog box that informs you that setup has failed to start one or more services.
Now you’re ready to install ISA Server Service Pack 1.
Install ISA Server Service Pack 1
The next step is to immediately install ISA Server Service Pack 1. You can get Service Pack 1 at http://www.microsoft.com/isaserver/downloads/sp1.asp Download SP1 to a machine on the internal network, scan it for viruses, then copy it to the ISA Server. Perform the following steps after copying the service pack to the ISA Server:
  1. Double click on the isasp1.exe file. Type in a path to put the temporary files in the Choose Directory for Extracted Files dialog box. Click OK.
  1. Click I Agree in the End User License Agreement (EULA) dialog box. 
  2. Click OK in the Microsoft ISA Server 2000 Update Setup dialog box. The computer will restart
    That’s all there is to installing ISA Server service pack 1.


    Install HotFix isahf255.exe
    Log onto the machine after the ISA Server service pack 1 installation routine restarts the machine. There are a few hotfixes and updates you need to install on the Windows Server 2003/ISA Server machine to insure that everything works correctly. You can download the HotFix pack, isahf255.exe at http://www.microsoft.com/downloads/details.aspx?familyid=77d89f87-5205-4779-b1ab-fc338283b2d9&displaylang=en 
    Download the file to a machine on the internal network, scan it for viruses, and then copy it to the ISA Server. Perform the following steps after copying the file to the ISA Server: 

    1.  Double click on the isahf255.exe file. Type in a path for the temporary files in the Choose Directory for Extracted Files dialog box, then click OK.
 
               2.  Click I Agree in the EULA dialog box
            3. Click OK in the Microsoft ISA Server 2000 Update Setup dialog box that informs you that the update was successful applied.

 
Note that you do not need to restart the server. The next step is to install Feature Pack 1.
Install Feature Pack 1
Feature Pack 1 (FP1) is not required. You don’t have to install ISA Server Feature Pack 1 on the Windows Server 2003/ISA Server machine to get it working correctly. However, I do highly recommend that you install ISA Server Feature Pack 1 because it adds a lot of cool new capabilities and Wizards. You can download ISA Server Feature Pack 1 at http://www.microsoft.com/downloads/details.aspx?FamilyID=2f92b02c-ac49-44df-af6c-5be084b345f9&DisplayLang=en
Download the feature pack to a machine on the internal network and scan it for viruses. Then copy the file to the ISA Server and perform the following steps: 
1. Double click on the isaftp1.exe file. Type in a path for the extracted files in the Choose Directory For Extracted Files dialog box.
2. Click I Agree in the Feature Pack 1 EULA dialog box. 
3. Click OK in the Microsoft ISA Server 2000 Feature Pack 1 dialog box.  Leave the checkmark in the Read about ISA Server Feature Pack 1 checkbox to learn more about what you get with Feature Pack 1.